
vendor-unknown
Make a project using Arduino sensor shield using DHT11 temperature and humidity sensor interfacing with Arduino uno - KT722
Make a project using Arduino sensor shield using DHT11 temperature and humidity sensor interfacing with Arduino uno - KT722
SKU:KT722
1000 in stock
Couldn't load pickup availability
- For Bulk Order Click Here
- Need Customer Support?
- Free Delivery Above 999/-
Note: In case you receive a damaged or faulty product, please return it in the original box with all foam and packaging. Returns will not be accepted if further damage occurs due to improper packing.
If you order a product that is currently in Preorder, and the price of that item increases in the future, you will be required to pay the difference in price.
For refund/return/replacement, call us at +91 95995 94520 or email us at support@rees52.com
Delivery Time
Delivery Time
- Delivery time with the Express Shipping option is 2-3 working days, and with the Standard Shipping option is 5-6 working days. It varies based on location, reliant on courier services.
- Delivery time if the order item is on Preorder Status is 15-20 working days.
COD (Cash on Delivery)
COD (Cash on Delivery)
- For COD you have to pay extra charges of Rs 350/- before the shipment. (We will share the company QR Code, UPI ID or Account details for the same)


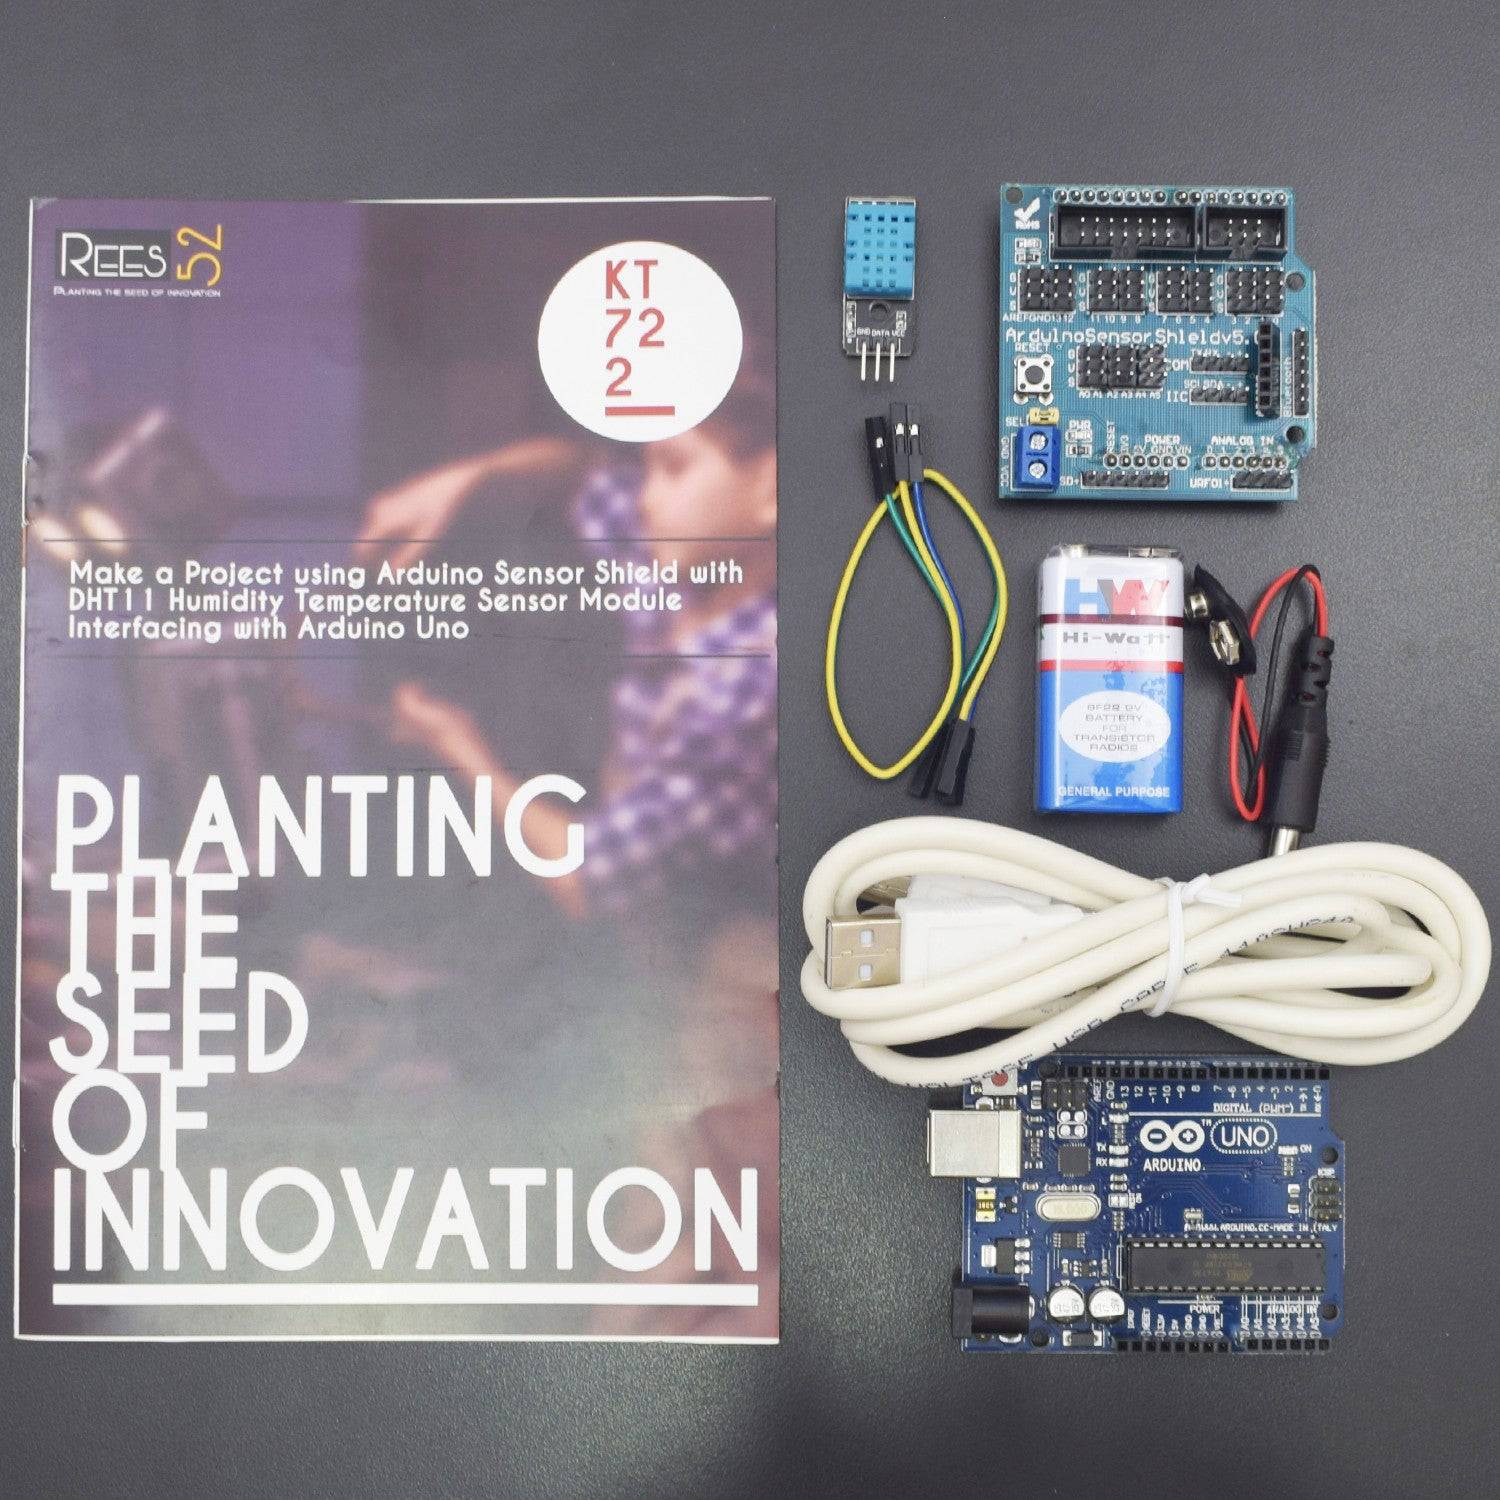
KIT INCLUDES:
- Arduino Sensor shield – 1
- DHT11 Humidity temperature sensor module –1
- 9V Battery - 1
- Snapper with DC jack -1
- Arduino uno with USB Cable - 1
HARDWARE REQUIRED
- Arduino Sensor shield – 1
- DHT11 Humidity temperature sensor module –1
- 9V Battery - 1
- Snapper with DC jack -1
- Arduino uno with USB Cable - 1
SOFTWARE REQUIRED
Arduino IDE 1.8.5 (programmable platform for Arduino)
Click To Download :https://www.arduino.cc/en/Main/Software


SPECIFICATIONS
DHT11 TEMPERATURE AND HUMIDITY SENSOR
Here are the ranges and accuracy of the DHT11:
- Humidity Range: 20-90% RH
- Humidity Accuracy: ±5% RH
- Temperature Range: 0-50 °C
- Temperature Accuracy: ±2% °C
- Operating Voltage: 3V to 5.5V
- 3 to 5V power and I/O
- 2.5mA max current use during conversion (while requesting data)
- Good for 0-100% humidity readings with 2-5% accuracy
- Good for -40 to 125°C temperature readings ±0.5°C accuracy
- No more than 0.5 Hz sampling rate (once every 2 seconds)
- Body size 15.1mm x 25mm x 7.7mm
ARDUINO SENSOR SHIELD
- IIC interface
- 32 way steering controller interface
- Bluetooth module communication interface
- SD card module communication interface
- The APC220 Wireless RF module communication interface
- RB URF v1.1 ultrasonic sensor interface
- 12864 LCD serial and parallel interface
PIN DESCRIPTION
DHT11 TEMPERATURE AND HUMIDITY SENSOR

ARDUINO SENSOR SHIELD

LIBRARY REQUIRED
To run the appropriate code in Arduino IDE you will first have to install the DHT library in you Arduino directory.
Download the zip file from
(http://hobbyist.co.nz/sites/default/files/WeatherStation/DHT.zip) and place it in your Arduino library folder. The path to Arduino library folder for my computer is
Documents/ Arduino/ Libraries
Unzip the downloaded file and place it in this folder.
After copying the files, the Arduino library folder should have a new folder named DHT containing the dht.h and dht.cpp. After that copy the following code in the Arduino IDE and upload the code.
CIRCUIT CONNECTION
- First of all , we put all sensor shield on arduino uno.
- Then connect the dht11 sensor on sensor shield port as define in code
- Upload the code to arduino uno.
- At Last, open the serial monitor for result show to display.
Note: Here we are using Sensor shield but you can use arduino uno because pin connections are same.
CODE
Click to see code here: https://docs.google.com/document/d/e/2PACX-1vS3LFfUkBB2V0Jv-mAqWy4XzcUzADiNmE2T0aLQEwn42oYtu4DiltsoLkgP0w0zkK-mIxM8wC-u4PEO/pub
WORKING
Welcome to the Arduino Based Humidity check Project which consists of DHT11 Humidity & Temperature Sensor Module and Arduino Sensor Shield. The humidity is sensed using a moisture dependent resistor. It has two electrodes and in between them there exist a moisture holding substrate which holds moisture. The conductance and hence resistance changes with changing humidity. Both these temperatures and humidity a changes are processed by an IC placed on the other side of the board. It calculates the values of both and can transmit those values to a microcontroller using only a single data line.
In this project we use sensor shield interfacing with Arduino Uno in which we connect the Dht 11 with sensor shield and reading will be shown on serial monitor.
In this project we use sensor shield interfacing with arduino uno in which we connect the dht 11 with sensor shield and reading will shows on serial monitor.
