


vendor-unknown
Make A Fingerprint Based Biometric Attendance System using Arduino Uno - KT849
Make A Fingerprint Based Biometric Attendance System using Arduino Uno - KT849
SKU:KT849
92 in stock
Couldn't load pickup availability
- For Bulk Order Click Here
- Need Customer Support?
- Free Delivery Above 999/-
Note: In case you receive a damaged or faulty product, please return it in the original box with all foam and packaging. Returns will not be accepted if further damage occurs due to improper packing.
For refund/return/replacement, call us at +91 95995 94520 or email us at support@rees52.com
Delivery Time
Delivery Time
- Delivery time with the Express Shipping option is 2-3 working days, and with the Standard Shipping option is 5-6 working days. It varies based on location, reliant on courier services.
- Delivery time if the order item is on Preorder Status is 15-20 working days.
COD (Cash on Delivery)
COD (Cash on Delivery)
- For COD you have to pay extra charges of Rs 350/- before the shipment. (We will share the company QR Code, UPI ID or Account details for the same)

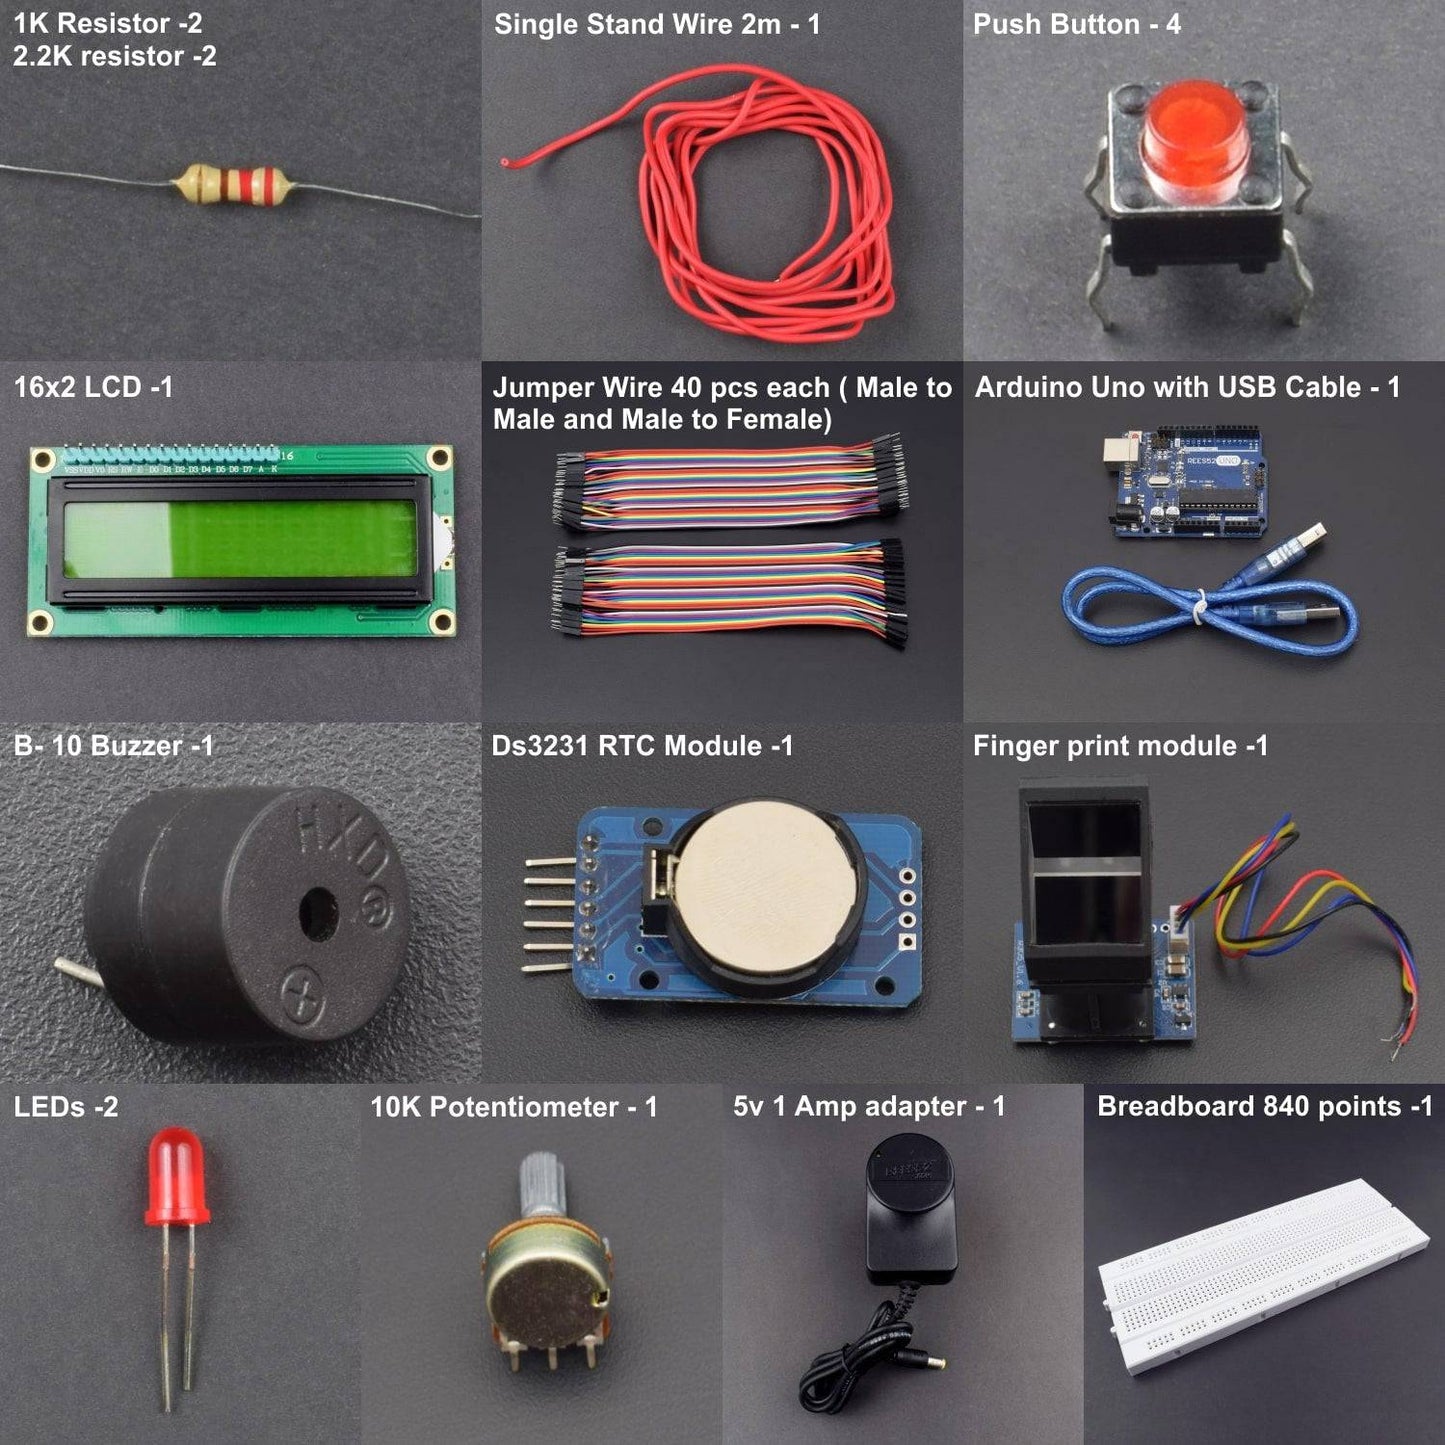

- Arduino Uno with USB cable -1
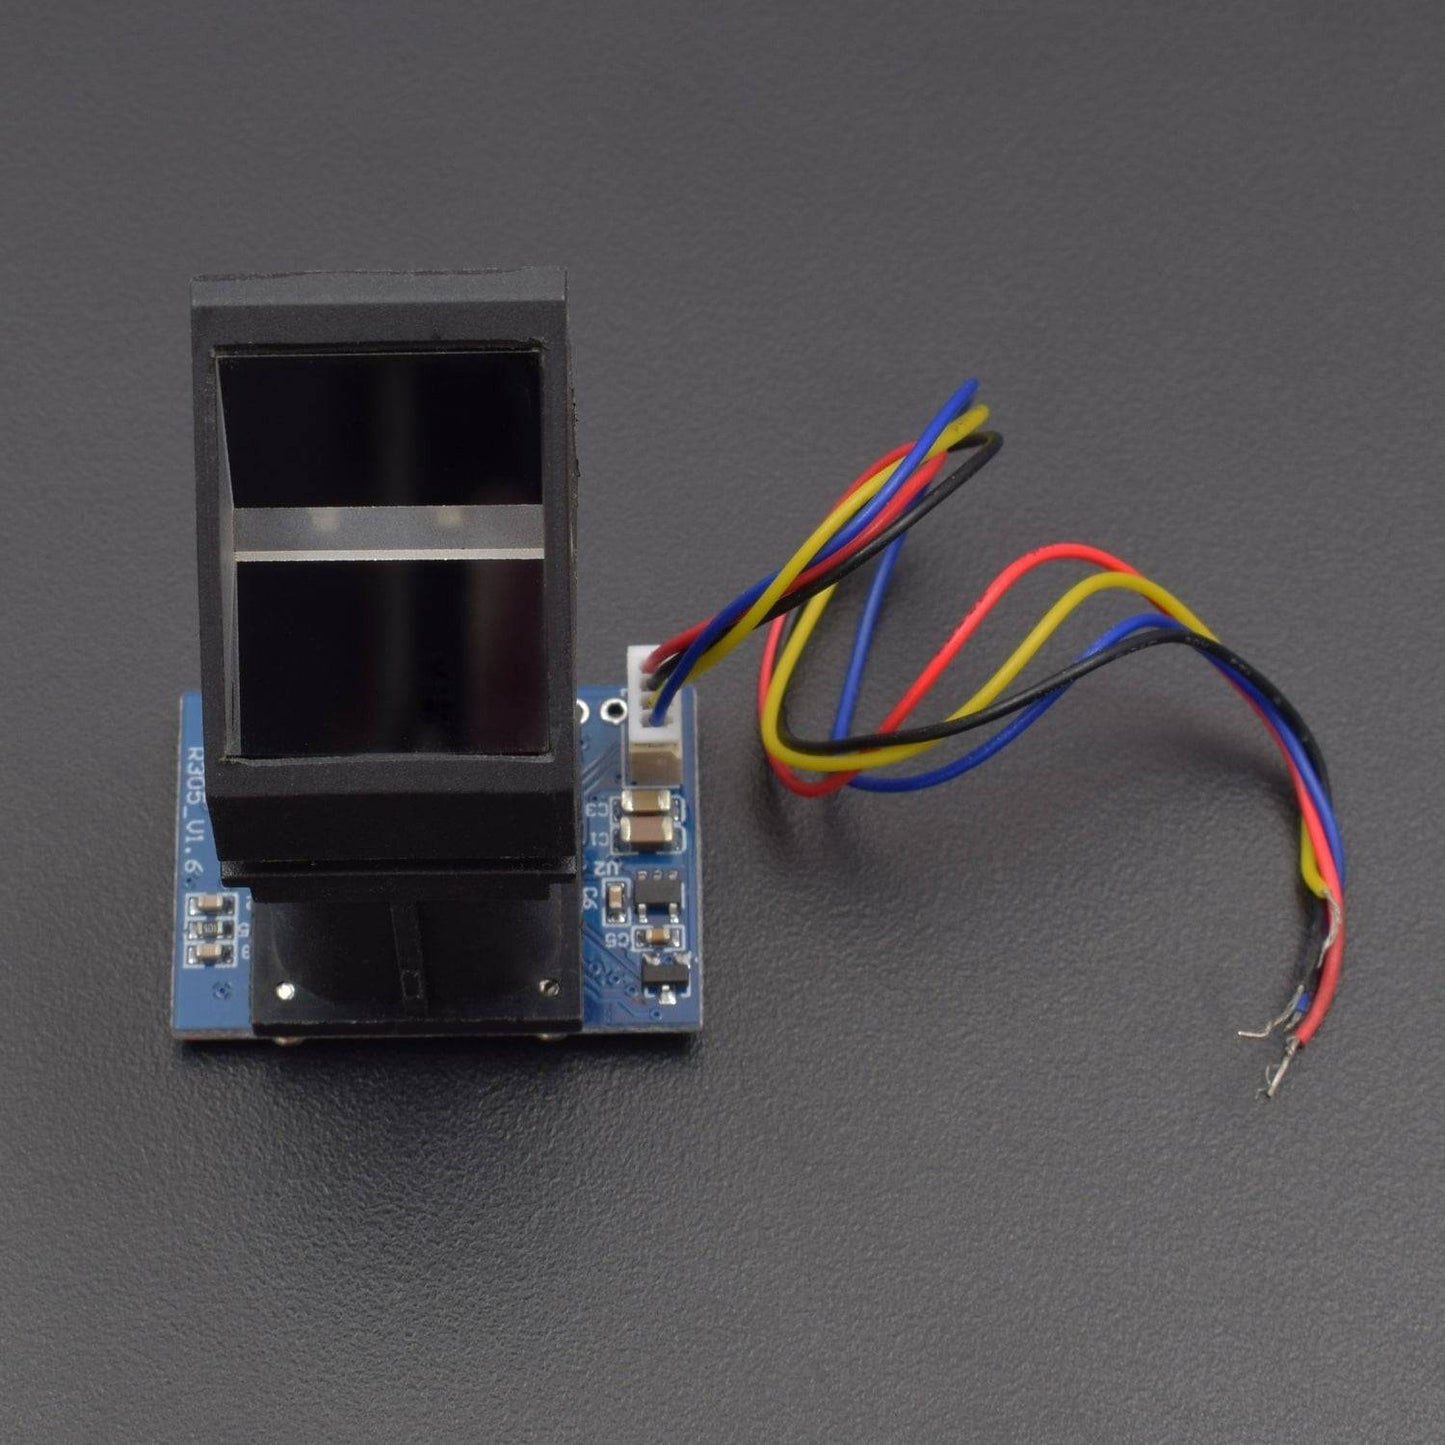
- Finger print module -1
- Push Button - 4
- LEDs -2
- 1K Resistor -2
- 2.2K resistor -2
- 5v 1 Amp adapter - 1
- Single Stand Wire 2m - 1
- B- 10 Buzzer -1
- 16x2 LCD -1
- Bread Board 840 points -1
- DS3231 RTC Module -1
Attendance systems are commonly used systems to mark the presence in offices and schools. From manually marking the attendance in attendance registers to using high-tech applications and biometric systems, these systems have improved significantly.
In this project, we used a fingerprint Module and Arduino to take and keep attendance data and records.
HARDWARE REQUIRED
- Arduino Uno with USB cable -1
- Finger print module -1
- Push Button - 4
- LEDs -2
- 1K Resistor -2
- 2.2K resistor -2
- 5v 1 Amp adapter - 1
- Single Stand Wire 2m - 1
- B- 10 Buzzer -1
- 16x2 LCD -1
- Bread Board 840 points -1
- DS3231 RTC Module -1
SOFTWARE REQUIRED
Arduino IDE 1.8.5 (programmable platform for Arduino)
Click To Download:https://www.arduino.cc/en/Main/Software
SPECIFICATIONS
Optical Fingerprint Sensor

- Supply voltage: 3.6~6.0 V
- Operating current(Max) : 120 mA
- Fingerprint imaging time: 1.0 S
- Match Mode: Compare Mode 1:1
- Search Mode: 1:N
- Storage capacity: 162 templates
- False Acceptance Rate : 0.001% (Security level 3)
- False Reject Rate :1.0% (Security level 3)
- Baud rate :9600, 19200, 28800, 38400, 57600bps (default is 57600)
- Interface:TTL Serial
- Work Temperature:-20 ~ +50 ℃
- Interface
The first 4 pins are for serial communication with the default baud rate of 57600. Users may set the baud rate in 9600 -115200 bps. Pins 5 – 8 are for USB communication.
16*2 lcd Display

Symbol |
External Connection |
Function |
VSS |
Power Supply |
Signal GROUND for lcm |
VDD |
POWER SUPPLY for logic lcm |
|
V0 |
Contrast Adjust |
|
RS |
MPU |
Register Select Signal |
RW |
MPU |
Read/Write Select Signal |
E |
MPU |
Operation Enable Signal |
DB0~DB3 |
MPU |
Four Low order bidirectional three-state bus lines. Used for data transfer between the MPU and LCM. These four are not used between 4 Bit operations. |
DB4~DB7 |
MPU |
Four high order bidirectional Three state bus lines are used for data transfer between the MPU |
A |
LED BKL power Supply |
Power Supply for BKL |
DS3231 RTC Module
Operating Voltage |
3.3 V-5.5 V DC |
Chip |
DS3231 |
Pin no. |
6 |
Operating Temperature Ranges |
Commercial: 0°C to +70°C |
Industrial: -40°C to +85°C | |
Power Consumption |
Low |
Accuracy ±2ppm |
0°C to +40°C |
Accuracy ±3.5ppm |
-40°C to +85°C |
I2C Interface |
Fast (400KHZ) |
Digital Temp Sensor Output |
±3°C Accuracy |
CIRCUIT DESCRIPTION
It has Arduino for controlling all the processes of the project, push-button for enrolling, deleting, selecting IDs and for attendance, a buzzer for alerting, LEDs for indication and an LCD to instruct users and show the resultant messages.

As shown in the circuit diagram,
- a push-button is directly connected to pin A0(ENROL), A1(DEL), A2(UP), A3(DOWN) of Arduino with respect to the ground And a Yellow LED is connected at Digital pin D7 of Arduino with respect to the ground through a 1k resistor.
- Fingerprint module’s Rx and Tx are directly connected at Serial pin D2 and D3 (Software Serial) of Arduino.
- 5v supply is used for powering fingerprint module taken from Arduino board. A buzzer is also connected at pin A5.
- A 16x2 LCD is configured in 4-bit mode and its RS, EN, D4, D5, D6, and D7 are directly connected at Digital pin D13, D12, D11, D10, D9, and D8 of Arduino
WORKING PRINCIPLE
Whenever a user places his finger over the fingerprint module the fingerprint module captures the finger image and searches if any ID is associated with this fingerprint in the system. If fingerprint ID is detected then LCD will show Attendance registered and at the same time buzzer will beep once and the LED will turn off until the system is ready to take input again.
Along with the fingerprint module, we have also used an RTC module for Time and date. Time and date are running continuously in the system. So Arduino takes time and date whenever a true user places his finger over a fingerprint and saves them in the EEPROM at the allotted slot of memory.
Here we have created 5 user spaces in this system for 30 days. By pressing the RESET button in Arduino and then immediately enrol key will be responsible for downloading attendance data over the serial monitor from the Arduino EEPROM Memory.

CODE
WORKING
- First of all, the user needs to enrol fingerprints of the user with the help of pushbuttons. To do this, the user needs to press ENROLL key and then LCD asks for entering the ID for the fingerprint to save it in memory by ID name. So now the user needs to enter their ID by using the UP/DOWN keys.
- After selecting ID, the user needs to press the OK key (DEL key). Now LCD will ask to place a finger over the fingerprint module.
- Now user needs to place his finger over the fingerprint module and then the module takes a finger image.
- Now the LCD will say to remove finger from fingerprint module, and again ask to place finger again. Now user needs to put his finger again and the module takes an image and converts it into templates and stores it by selected ID into the fingerprint module’s memory.
- Now the user will be registered and he/she can feed attendance by putting their finger over the fingerprint module. By the same method, all the users will be registered into the system.
- Now if the user wants to remove or delete any of the stored ID or fingerprint, then he/she need to press the DEL key. Once the delete key is pressed LCD will ask to select the ID that needs to be deleted. Now user needs to select ID and press the OK key (same DEL key). Now LCD will let you know that fingerprint has been deleted successfully.