

vendor-unknown
Connect CMOS OV7670 camera with Arduino Uno - KT979
Connect CMOS OV7670 camera with Arduino Uno - KT979
SKU:KT979
999 in stock
Couldn't load pickup availability
- For Bulk Order Click Here
- Need Customer Support?
- Free Delivery Above 999/-
Note: In case you receive a damaged or faulty product, please return it in the original box with all foam and packaging. Returns will not be accepted if further damage occurs due to improper packing.
If you order a product that is currently in Preorder, and the price of that item increases in the future, you will be required to pay the difference in price.
For refund/return/replacement, call us at +91 95995 94520 or email us at support@rees52.com
Delivery Time
Delivery Time
- Delivery time with the Express Shipping option is 2-3 working days, and with the Standard Shipping option is 5-6 working days. It varies based on location, reliant on courier services.
- Delivery time if the order item is on Preorder Status is 15-20 working days.
COD (Cash on Delivery)
COD (Cash on Delivery)
- For COD you have to pay extra charges of Rs 350/- before the shipment. (We will share the company QR Code, UPI ID or Account details for the same)
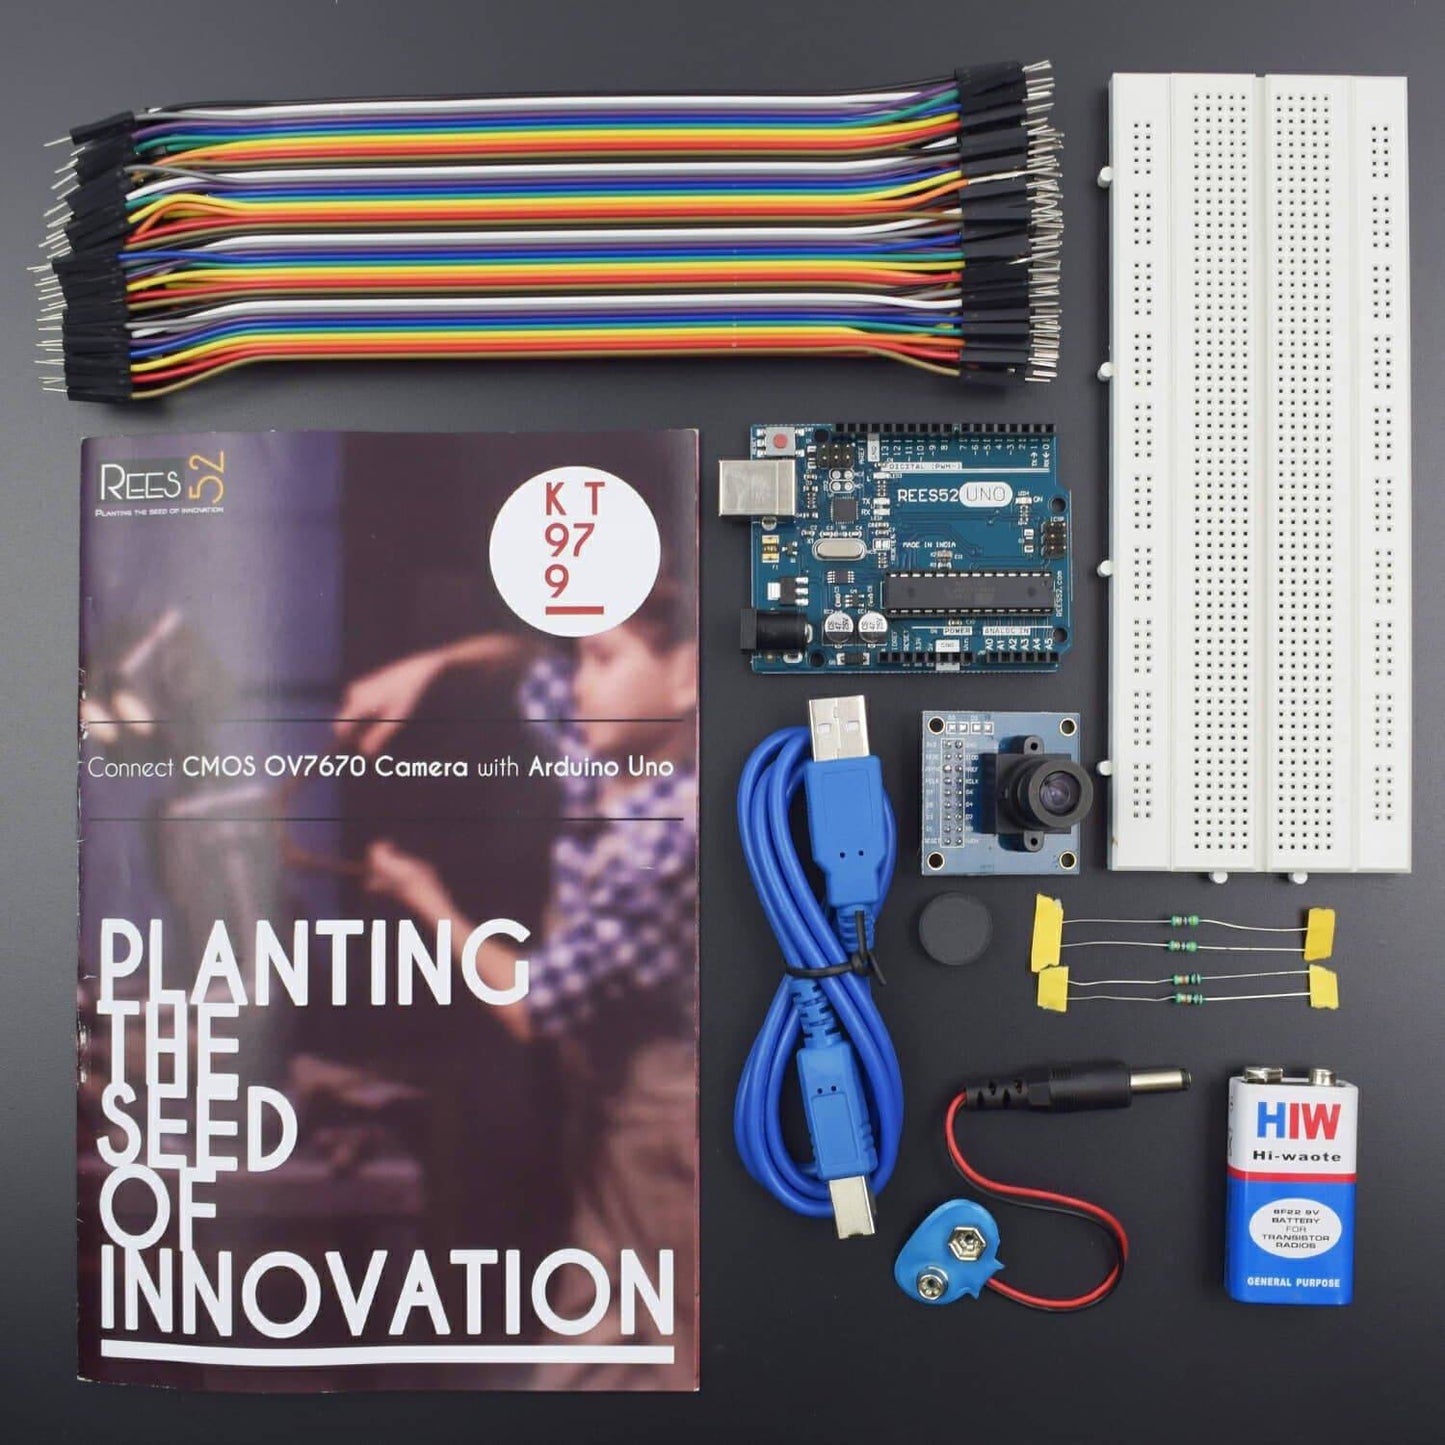
KIT INCLUDES:
- CMOS Ov7670 camera -1
- Arduino uno with USB Cable – 1
- Bread board 840 point - 1
- Jumper wire male to female- 40 pieces
- Jumper wire male to male- 40 pieces
- Resistance 10 k ohm- 2 piece
- Resistance 7 k ohm - 2 piece
The camera module is powered from a single +3.3V power supply. An external oscillator provide the clock source for camera module XCLK pin. With proper configuration to the camera internal registers via I2C bus, then the camera supply pixel clock (PCLK) and camera data back to the host with synchronize signal like HREF and VSYNC. The OV7670 camera module is a low cost 0.3 mega pixel CMOS color camera module, it can output 640x480 VGA resolution image at 30fps. The OV7670 camera module build in onboard LDO regulator only single 3.3V power needed and can be used in Arduino, STM32,Chipkit, ARM, DSP , FPGA and etc.
HARDWARE REQUIRED
- CMOS Ov7670 camera -1
- Arduino uno with USB Cable – 1
- Bread board 840 point - 1
- Jumper wire male to female- 40 pieces
- Jumper wire male to male- 40 pieces
- Resistance 10 k ohm- 2 piece
- Resistance 7 k ohm - 2 piece
SOFTWARE REQUIRED
Arduino IDE
Arduino IDE 1.8.5 (programmable platform for Arduino)
Click To Download:https://www.arduino.cc/en/Main/Software

Code
Click to see the code or copy the link.
https://drive.google.com/open?id=1jw0vFKKPVtBTvKHk42uYc0OuB1QG08xi
Output Software


.net 3.5 framework


SPECIFICATIONS
CMOS OV7670 Camera
- Array Element:640X480
- IO Voltage: 1.7V to 3.0V
- Power operation: 60mW/15fpsVGAYUV
- Sleep:<20μA
- Operating Temperature: -30 ℃ to 70 ℃
- Stable: 0 ℃ to 50 ℃
- Output Formats (8): YUV/YCbCr4: 2:2, RGB565/555, GRB4: 2:2, Raw RGB Data
- Lens size: 1/6 "
- Chief ray angle: 24 °
- Maximum image transfer rate: 30fps VGA
- Sensitivity: 1.3V / (Lux-sec)
- SNR: 40 dB
- Dynamic range: 52 dB
- Scan Mode: Progressive
- Electronic Exposure: 1 line to 510 line
- Pixel Size: 3.6μm x 3.6μm
- Dark current: 12 mV / s at 60 ℃
Features
- High sensitivity suitable for low light operation
- Low voltage suitable for embedded applications
- Standard SCCB interface compatible with I2C interface
- Supports VGA, CIF, and from a variety of sizes CIF to 40x30
- VarioPixel sub-sampling mode
- ISP has a compensation function to eliminate noise and dead pixels
- Support for image scaling
- Compensation for loss of optical lens
- 50/60Hz automatic detection
- Saturation automatically adjust (UV adjustment)
- Automatically adjust edge enhancement
- Automatically adjust the noise reduction
- Automatically affect the control functions include: automatic exposure control, automatic gain control, automatic white balance, automatic elimination of light stripes, automatic black level calibration image quality control including color saturation, hue, gamma, sharpness
PROCESS
CMOS OV7670 Camera


Step -1


Step-2
Download the following from the link description:
- Code.
- Output software.
- .net v3.5
Step -3
- Copy the code into your Arduino ide.
- Choose the com port from the board.
- Remember the com port.
- Upload your code.
Step -4
- Run the output software exe

Choose your com port --> click start
Probably something similar is what you would be seeing.


Troubleshooting
If not the exact image you expected, then you might want to trouble shoot,
Case 1: if you are not able to open the output software-
Check for the .net 3.5 installation.
Case 2. If you are having issues with viewing images or not responding software
Check for the wirings 9/10 people go wrong here.
Case
Simply adjust the screw of your camera lens and view different images till they seems to be clear
